DIY Coin Bank

A while back (during the summer, I remember), I bought some plastic firm-shaped terrariums from Ikea. They came as a set of three for around $ten. And as soon as I saw them, I knew exactly what I wanted to make. I noticed some little slots at the top of each house, for venting the terrarium I imagine, and thought they looked like little money slots. So, naturally I felt compelled to make a house-shaped coin bank (well, I telephone call it a piggy bank, even though its non pig shaped).
That said, I struggled at first to find a material to embrace the houses in that looked absurd and was durable plenty for use. Luckily, I heard nearly Walls Need Honey not long afterward and partnered with them on this project.
If you don't know about Wall Need Love already, you lot should because they're crawly! It'due south a Nashville-based agglutinative fine art company that helps bridge the gap between art and wall.They brand removable adhesive wallpaper (and a whole lot more) in astonishing patterns, like bananas (!!!). Head over here for the full product lineup.
And speaking of bananas, today's project definitely fits into that category. Shall we get started?

Materials:
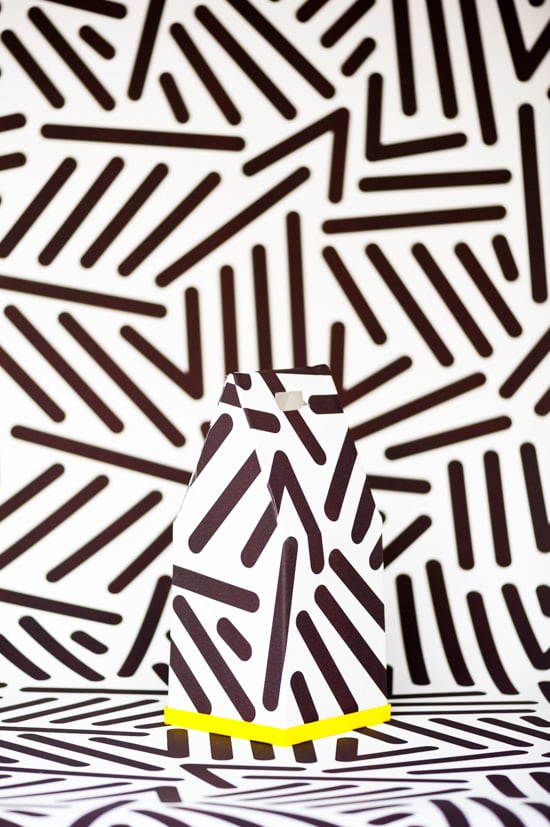
– removable wallpaper decals (I used Velvet Bananas + Retro Pop)
– Like shooting fish in a barrel stripe (I used 1.5 inch ocean and 1 inch xanthous)
– shape blade / boxcutter
– plastic house terrariums from Ikea (or milk cartons, since they're a similar shape)
Quick notes earlier getting started… I LOVE the designs that I selected for these coin banks, but there are TONS of blueprint options on the website as well, in case my picks are a little too crazy for ya. The quality is height notch, for existent (I wouldn't say that if it wasn't)! And would exist bang-up for more than 'traditional' wallpaper applications too, since it's and then easy to employ to surfaces (and remove).
I would also recommend grabbing some Easy Stripe. Information technology comes in 25 colors, multiple widths, and doubles as chalkboard! Yep, yous tin write on information technology with chalk! How fun would that be on a larger scale, equally a wall blueprint or something?

How To:
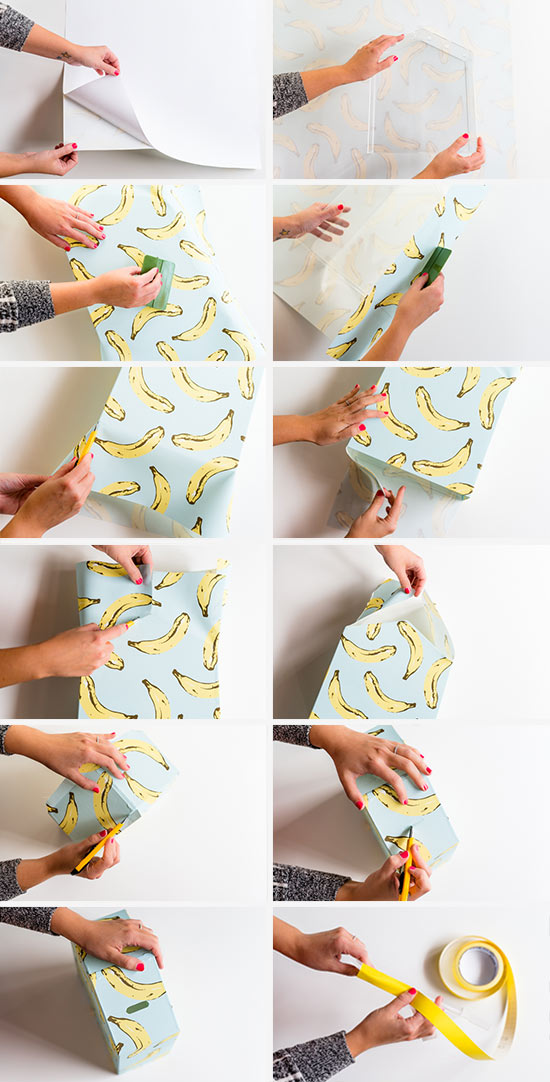
one. Cut the wallpaper decal down to the proper size. You desire to be able to completely cover the firm all the way around and leave several actress inches on each side to give you some wiggle room. Then remove the backing. Place the firm onto the wallpaper, being certain to leave extra room at the top and bottom (as shown in photograph).
2. Then, flip the whole thing over and smooth out any bubbles, being conscientious not to allow the wallpaper to attach to whatever other sides just yet.I used a special tool to help push button any air bubbles out, merely yous tin merely as easily utilize your hands and only start at one finish and utilise even pressure level.
3. Use this aforementioned process to wrap / attach the remaining base sides of the house with the wallpaper. Do not do anything with the angles pinnacle pieces yet. And smoothen out whatsoever air bubbling as yous go.
4. Next, use a sharp blade to cut 4 flaps from the backlog of the lesser of the base of the business firm (one flap cut at each of the four corners). Then, secure each flap to the inside of the firm.
5. Once the bottom base surface area is finished, it's time to move onto the top. This office is a footling more difficult, I'thou not going to lie. But information technology's totally doable. Promise! Information technology's like wrapping an oddly shaped packet.
Lay the house flat once again and start past cut a line from the centre meridian of the excess wallpaper (where the indicate of the house's roof is). And then, carefully cut a line downward the roof, on each side that is currently facing upwards. I left a picayune bit of excess that I could curl over to the pinnacle to give myself some extra breathing room for step 7. But it'south up to you.
6. Flip the firm over and echo this process on the other side. Y'all know you did information technology correctly if y'all're left with two flaps that are nevertheless attached. Encounter photo.
7. Next, cover the meridian of the roof with the flaps that are remaining and smoothen out any bubbles equally you lot get. And then, cutting the backlog from the reaming roof sides, similarly to what yous did in steps 5 and half dozen.
8. Then, using the preexisting slots from the plastic every bit your guide, cut a coin slot with a blade.
9. In one case that'south done, all you lot have to practice is cover the base of operations tray in Easy stripe and pop the house on pinnacle. Now your coin bank is ready to use! You lot can add another strip of easy tape to the front of the banks too, if yous want to write trivial chalkboard messages or just similar the decorative chemical element.
This would be a fun souvenir for the holidays likewise. Christmas is only 5 weeks away!


Photography by Rachel Brewer and Amelia Tatnall
Concept and styling by Brittni Mehlhoff
Assisted by Anissa Saxton
Think you'll give this coin banking concern a try? Or do you have another projection you lot might employ this wallpaper for? Really curious to here your suggestions because I accept a ton of wallpaper leftover.
—
This post is in partnership with Walls Need Love. Thank y'all for supporting the brands that help keep Paper & Stitch running.
Source: https://www.papernstitchblog.com/pattern-centric-diy-coin-bank/
0 Response to "DIY Coin Bank"
Post a Comment